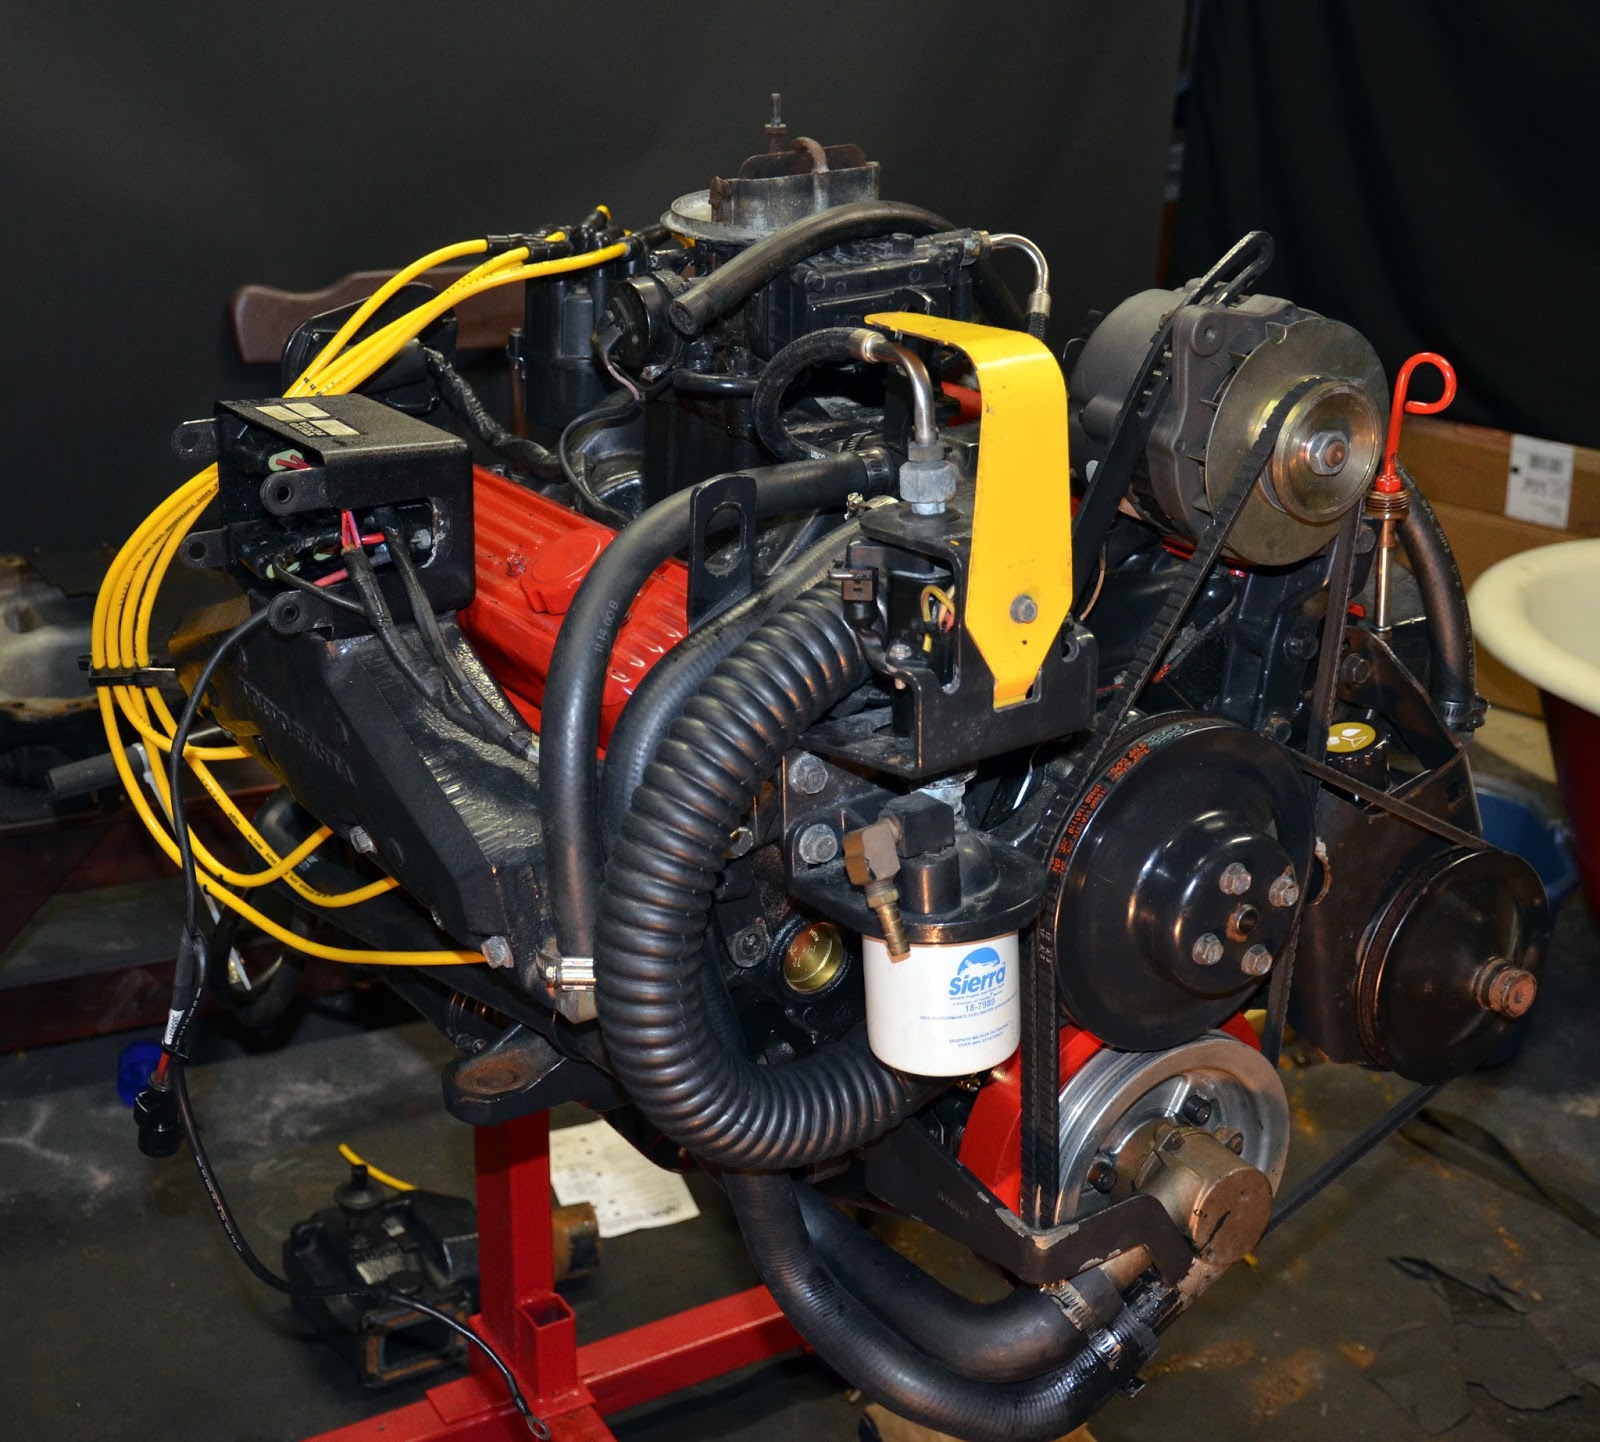
Doing Your Own Engine Rebuild (Written by Captain Frank Taylor)
 |
| The Volvo Penta 5.7 Engine after the finished rebuild in 2015 |
A few weeks ago, I wrote an article about hydrolock. In the article, I mentioned that I had
experienced hydrolock on a previous boat and that it caused damage to the
engine. To be more precise, it took the
engine out. Here is how I handled that
situation.
In July of 2014, I experienced something that no boater
wants to experience. I great day out on
the lake turned ugly all of a sudden when my engine went down hard. At the time, I did not know exactly what the
issue was but based on the sound that it made, I knew that it was not a simple
fix.
Earlier in the day, my engine had ingested water, something
that I had experienced before. I knew
how to handle it though. I pulled the
plugs out, yanked the kill switch cord and cranked the engine over several
times, allowing the water to be expelled from the cylinders. After drying the plugs, putting them back in
and reconnecting the plug wires, my beloved toy roared back to life. The friends that I had aboard seemed
impressed with my handling of the situation and I felt a sense of pride as we
headed out on the lake for a day of fun.
Later that evening as the sun set and it was time to head
home, I started the boat once again and pointed the bow in the direction of my
home port. We were just coming up onto
plane with the engine turning at about 3200 rpm and suddenly the sound of the
engine was interrupted by a loud screech, a bang, and then silence. The boat immediately fell off plane and
eventually drifted to a stop. For
several seconds, I was stunned. What had
happened? Interestingly enough, I did
not even attempt to restart the engine.
I did not know what had happened but whatever it was, I knew it was
bad. I dropped anchor and got on the
radio to call a tow boat. Once I got the
boat back to the slip, I did build up the courage to turn the key but nothing
happened. Even though it is quite
unusual for hydrolock to occur at higher rpm’s, I went through the same process
as I had earlier in the day, removing the plugs and attempting to crank the
engine. Still, nothing.
For the next week or so, I pondered exactly how to deal with
the situation. Did I want to try and
figure out what happened to the engine myself?
Did I want to just take the boat to a repair facility? Should I call one of the marine mechanics
that I knew? Maybe I should just buy a new
engine. I called my cousin, David, in
Virginia who is probably the best engine builder on the planet and asked him
for his opinion. I’ll never forget what
he said.
“Aww Frankie, you can rebuild that engine yourself.”
“Uh, what do you mean?” I said. “I have never rebuilt any kind of engine
before.”
“That doesn’t matter, you are a smart guy,” he said. “If I can do it, so can you.”
I am pretty handy with tools, but I had never undertaken a
task quite like that before. But after
few more conversations with my cousin and some prodding from my good buddy, TJ,
somehow, I was convinced that I could do this.
I knew that my boating season was pretty much over for the year anyway
and it would make a good project over the winter. A few weeks later, with the help of some
friends, I was able to get the boat from the slip and onto the trailer for the
trip home.
The first thing that I had to figure out was how to get the
engine out of the boat. I had a two car
garage in which I could do the rebuild but the boat was too large to fit in the
garage. Sitting on the trailer, even
with the bimini in a lowered position, it sat about 9 ½ feet high. The only way to lift the engine out was for
me to build a gantry crane in my driveway.
Oh, boy, the neighbors are going to love this! I made measurements of the boat as it sat on
the trailer to ensure my homemade lifting contraption would be high enough and
wide enough. Most importantly, I needed
to make sure that it was strong enough to support the weight of the engine when
lifted out of the bilge. I drew up a
simple design and visited my local Home Depot to buy the materials I
needed. Within a week, it was done.
The next thing seemed pretty easy in theory; Just back the boat underneath the crane, unhook and unbolt everything and lift the engine out. Technically, this was true but my fear was that I would undo everything and then forget how it all went back together. I got the idea of using my Android Smartphone to document everything I did with photographs. If I took a picture of everything before taking it apart, I could later refer back to my gallery of photos to ensure that I could put it back together the same way.
 |
| The completed gantry crane ready for hoisting. |
The next thing seemed pretty easy in theory; Just back the boat underneath the crane, unhook and unbolt everything and lift the engine out. Technically, this was true but my fear was that I would undo everything and then forget how it all went back together. I got the idea of using my Android Smartphone to document everything I did with photographs. If I took a picture of everything before taking it apart, I could later refer back to my gallery of photos to ensure that I could put it back together the same way.
With the help of some friends, I removed the outdrive and disconnected
all connections in the engine compartment, taking pictures of everything along
the way. The engine was then hoisted out
of the bilge. I let it dangle in the air as the boat was pulled out from
underneath it and the bed of my friend’s pickup truck was backed in underneath
it. It just so happens that the previous
owner of my home was somewhat of a car fanatic and when he had the garage
constructed, he had a heavy beam installed in the ceiling so he could use it to
hoist engines from cars. I took the same
chain hoist that I had used on the gantry crane and moved it to the beam in the
garage ceiling. Using this setup, we
lifted the engine out of the truck bed and onto an engine stand that I had
purchased for the project.
 |
| Boat in place under the hoist. Jimmy and Hunter helping get everything disconnected. |
 |
| Engine connected to the hoist and ready for the lift. |
By the time that the engine was mounted on the stand, it was
late. I remember thinking that I needed
to get in the bed because I had to go to work the next day. I decided that I would use a pump to remove
the engine oil from the damaged engine and then call it a day. I connected the pump to the dipstick and
started pumping. To my astonishment, oil
was not coming out. Water was! In fact, I pumped two gallons of water out before
I hit the first drop of oil! Curiosity
was now seriously getting the best of me!
What had happened to my engine? I
decided that sleep was not that important, I needed to get this engine open now
so I could see what it looked like inside.
I decided to flip the engine over so I could remove the oil
pan and take a look. As the engine
rotated, I could clearly hear metal pieces tumbling and falling inside. Wow! That really did not sound good. I grabbed a wrench and removed the oil pan
bolts and lifted it away. What I saw
instantly explained why my engine stopped so suddenly and had absolutely no
hope of starting again. Apparently, one
of the piston rods had failed (probably due to a stress fracture from the
earlier hydrolock incident). The broken
pieces including the piece of the rod still attached to the crankshaft
proceeded to fly around thus doing damage to other internal engine
components. The piston that had been
attached to the rod had all but disintegrated in the process. My heart sank as I realized that the damage
done to the interior of the engine may make a rebuild somewhat more difficult
than I thought. I went to bed.
The next day, I woke up and after some research, decided
that given my situation, purchasing a long block would be easier and cost
effective. Basically, a long block
includes the engine block and the cylinder heads. When you replace a long block, you remove all
components such as valve covers, water pump, alternator, distributor etc. from
the old engine and put them on the new one.
By doing this, I would be replacing all damaged components on my
engine. I would also be replacing the
heads which, while they were still good, had over 1200 hours on them. I found a reputable dealer in Florida where I
could buy a remanufactured 5.7 marine long block shipped for $2000. This included a new oil pump, timing chain
cover and all seals that I would need for assembly. I put my order in and while I waited for it
to arrive, I started removing all of the components from the old engine. Once again, I carefully documented everything
as I went by taking pictures. Once this
was all done, I took the old block off of the engine stand. Since the cylinder heads were still good, I
was able to sell them on Craigslist for $150 and recoup some of my cost. I also sold the block to a scrap iron dealer
for a few bucks as well.  |
| I could see chunks of metal immediately after removing the oil pan. |
 |
| Looking into one of the cylinders from the bottom of the engine, a broken rod was evident. |
 |
| After the heads are removed, the damage is even more evident. |

 |
| The new long block unpacked and ready to go on the engine stand. |
I was excited when the new long block arrived. I could not wait to get it up on the engine
stand and start working on it but I knew that this was also where I needed to
take things easy and make sure I did them right. After all, this was the first time I had ever
done this. Taking things apart is easy
but I wanted to make sure that I put things back together the right way. Here are a few tips that really worked for
me.
1.
Youtube –
This was by far my most important tool.
For just about every task in assembling the new long block, I would
first look it up on Youtube. The good
thing is that the Volvo Penta 5.7 liter marine engine is a very popular engine. It is basically a GM 350 ci block that Volvo
Penta purchases from GM to modify for marine use. I was able to find an endless number of
videos that would show me how to do just about everything that I needed to do. In most cases, I would look at several
different videos on the same task so I could get more than one perspective on
the task at hand before doing it myself.
I used Youtube so much for this project that I set up an old laptop in
my newly created “engine shop” just for watching videos on building engines.
2.
Component Replacement – There were several
components that I chose to replace even though they were still working just
fine. I figured that there is no easier
time to replace an engine component that when the engine is out of the boat and
sitting on an engine stand and the last thing that I wanted was to put the
engine back in the boat and have another issue a month later because of a
component that I could have replaced during this project. Some of the components that I chose to
replace included:
a.
Water pump
b.
Impeller
c.
Oil pressure sensor
d.
Distributor and coil
e.
Hoses
f.
Belts
g.
Thermostat
h.
Engine mounts
For me, this just made sense. While I spent a bit more money to replace the
additional parts, I figured it would save me any potential headaches in the
future.
3.
Documentation – When assembling an engine, there
are a myriad of specifications that you will need to do it properly. Things like torque settings, engine timing
and spark plug gaps are all important when desiring to do the job right. I was able to find just about all of the
documentation that I needed online.
Again, since the engine block that I was dealing with was rather common,
documentation for everything could be easily found.
4.
Local Auto Parts Experts – It is important to
know that many components, while they may fit, should not be considered interchangeable
between cars and boats, particularly engine electrical parts such as
alternators. Other parts, however, such
as oil pressure sensors can be interchanged.
Of course, your local auto parts store probably cannot look up parts based
on a model of boat so it is best that you remove the part and take it to the
store with you. In many cases, I did
this and if I talked to the right expert at the store they were usually able to
find me what I needed. I must have
visited my local NAPA auto parts store 30 times over a three month period
(sometimes more than one visit in a day) to find different parts or tools that
I needed for this project. There was one
parts expert working at this store that had become quite familiar with my
project through discussions with me and I think he also felt a sense of pride
as well when it was finally done.
5.
The Right Tools – Nothing beats having the right
tool for the job. While my tool
collection has always been pretty decent, there were a few tools that I did
need to purchase during this project to complete it the right way. Some of these tools included:
a.
Engine stand
b.
Chain Hoist
c.
Timing light
d.
Torque wrench
e.
Oil pump primer
f.
Harmonic balancer puller
g.
Engine alignment tool
6.
Friends – Whenever you are working on a project
like this, friends are invaluable.
Whether it’s to simply provide moral support or to lend a hand when you
have a task at hand where one pair of hands just won’t cut it, friends are
irreplaceable. I spent many evenings and
rainy Saturdays in the garage working alone but I never would have gotten this project
complete without friends like TJ, Jimmy and Hunter who were there to assist
with things like hoisting the engine in and out of the boat or removing and
installing the outdrive.
For the next few weeks, I would spend some evenings and part
of my weekends, as time allowed, watching videos and working on my engine. Of course, a professional can do in engine
rebuild in a couple of days but my objective was to take my time, learn the
process and do it right. Since I had the
outdrive removed, I also took the opportunity to do some maintenance on it as
well. In addition, I thoroughly cleaned
the bilge and installed LED lighting, two things that were much easier to do
with the engine removed.
Once the engine was done, I set the initial timing (a method
of estimating the timing based on top dead center of the #1 cylinder) and it
was ready to be reinstalled. I
reinstalled it into the boat by reversing the process that was used to remove
it, making sure to reconnect everything in the proper manner. Since both the outdrive and the engine had
been completely removed, realignment of the engine to the outdrive was also
necessary to ensure that binding could not occur once the two were mated
again. A special alignment tool was
necessary to do this. Everything was
checked and rechecked and finally I was ready for the moment of truth.


 |
| The finished engine ready to be installed |
I filled the crankcase with oil, connected the external
water supply to the outdrive and crossed my fingers. With my buddy Jimmy standing nearby, I pumped
the throttle three times and turned the key.
After several rotations, she roared to life! I was so stunned! She actually started!! She was idling high and rough but I knew that
was because the timing was not set yet.
I grabbed my timing gun and a wrench and we went to work. Within a few minutes, she was purring like a
kitten at 650 rpm. I was filled with a
sense of pride. My baby was back! The next step was to do a 30 minute break in of the engine with it running at 2000 rpm and no load. After that, it would be time to clean her up and get her wet.
I ran the engine for 30 minutes at 2000 rpm and no load before putting the boat in the water.
It took several days to get my boat cleaned up. The project had really taken its toll. There was grease and dirt just about everywhere on deck. Once the cleanup was done, I took her back to the lake and put her in the water for her maiden voyage with the new engine. Everything went flawlessly. After a good hour zipping back and forth and up and down the lake, I backed her in to her slip and tied her up. I connected the shore power and stood there just looking at her. Everything was once again right with the world.
 |
| The Bear's Den back in her slip |
Visit our archive and check out more interesting articles from The Ship's Log by clicking here.
If you found this article useful, use the space below to subscribe and you will be notified by email every time a new article is published in The Ships Log. Don't forget to check your email afterwards for a subscription verification email from Feedburner. Your email address will only be used for notifying you when updates are made to The Ships Log.


Good work and write-up
ReplyDeleteThank you. I found that I really did enjoy this project and I enjoyed writing about it as well.
Delete